bright-cloud-studio/constant-contact-integration
Composer 安装命令:
composer require bright-cloud-studio/constant-contact-integration
包简介
Establish a connection between Contao and Constant Contact. Set up forms to automatically create Contacts and add them to Lists
README 文档
README
This package will establish a connection to the Constant Contact API from Contao, allow you to link a Contao Form to a Constant Contact List and Contao Form Fields to Constant Contact Fields. You can either check an option for a form with implied permission, like a simple form with just an email field and a submit button, or express permission by adding a checkbox to your form. Follow the directions below to get started.
NOTE: To keep your OAuth2 connection alive you will need to disable the default Contao Cron system in the Settings page by checking the "Disable the command scheduler" option and manually set up a cron call using the Web URL on your server. For more information check the Contao Manual here: https://docs.contao.org/dev/framework/cron/#web-url
First, activate the "Disable the command scheduler" option in Contao's Settings page

Then, manually set up a Cron job to Contao's cron URl and have it trigger minutely. Your OAuth2 keys will refresh hourly.

Setup Directions
- Step One: First things first, you will need to establish a connection with Constant Contact. To do this you will need to set up a page specifically for authorizing the connection. On Contao, set up a page for this purpose and copy its' unique URL. This will be our Redirect URL.
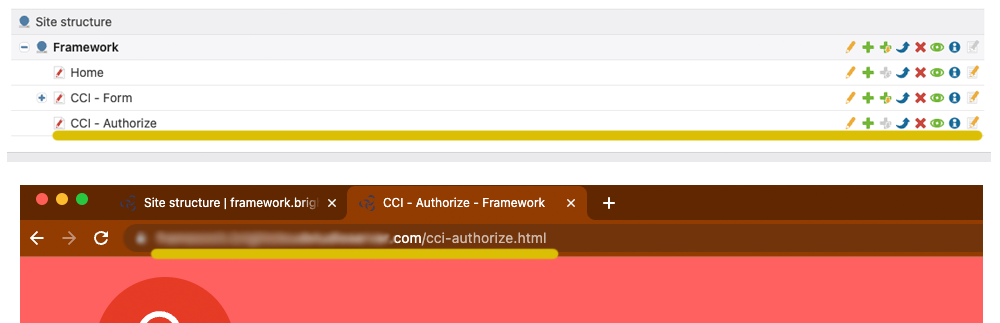
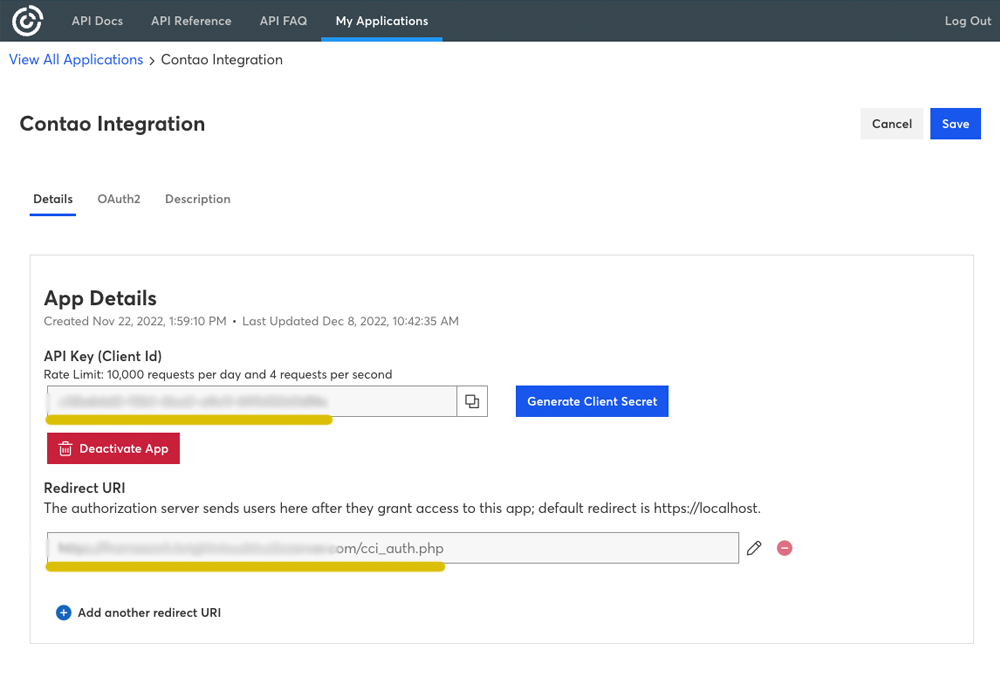
- Step Two: After creating a developer account for Constant Contact, we need to set up our Application. Create a new app, for "Application OAuth2 Settings" select the option "Authorization Code Flow and Implicit Flow" and for refresh token type choose "Rotating Refresh Token". Use the Redirect URL we got from Step One. Copy our API Key, Secret and Redirect URL and move onto Step Three.
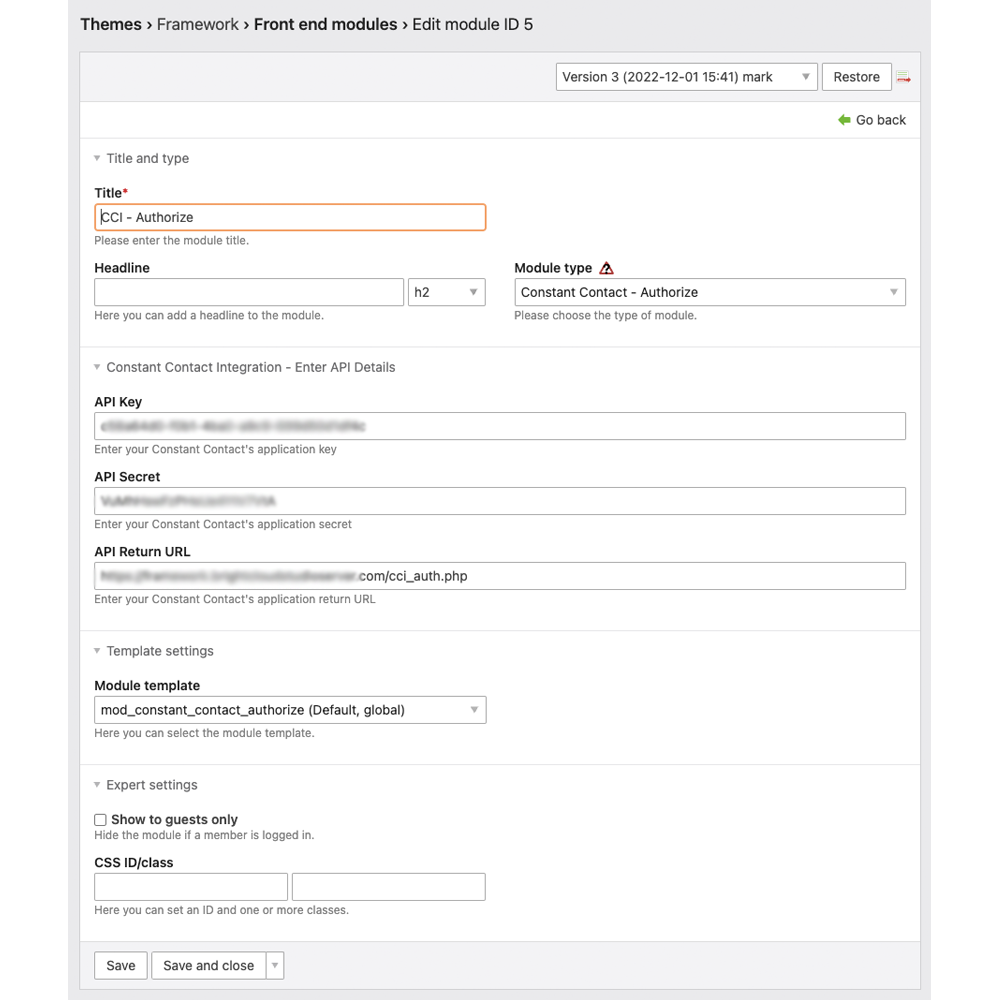
- Step Three: Within Contao, create a new "Constant Contact - Authorize" frontend module and fill in the API Key, Secret and Redirect URL.
- Step Four: Add the newly created frontend module to the authorize page we set up previously, then view that page. Once you view the page a link titled "Click here to finalize connection" will show, click it. If everything went as expected a message "You have successfully established a connection with the Constant Contact API" will display. To confirm everything worked, in your servers file browser navigate to the "public_html\web" folder and you should find two newly created files "token_access.txt" and "token_refresh.txt".
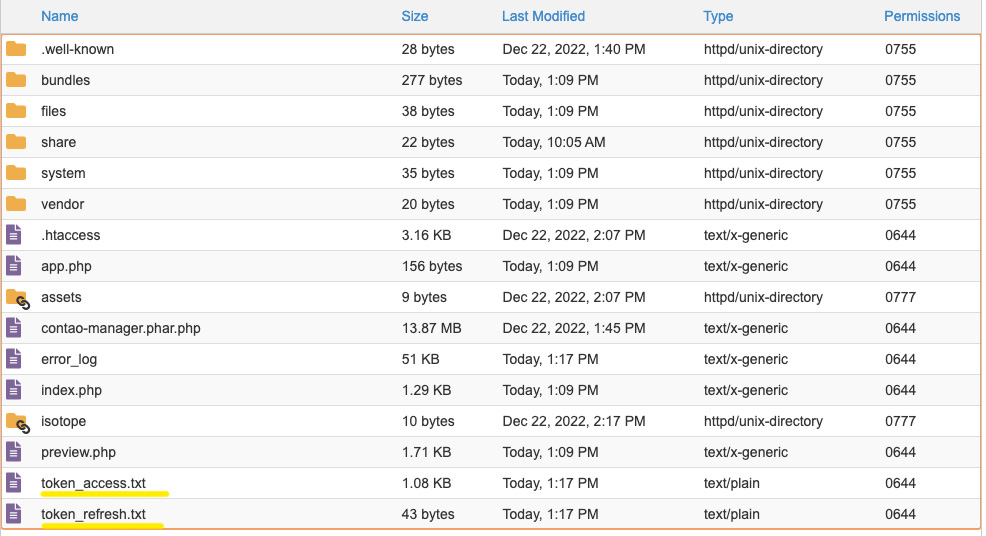
Congradulations! You have successfully connected your Contao installation with the Constant Contact API.
Now that you have successfully established your connection, let me explain how to use it.
- Step One: In the Contao Backend, when viewing the Settings page for a Form you will see two new options towards the bottom of the page.
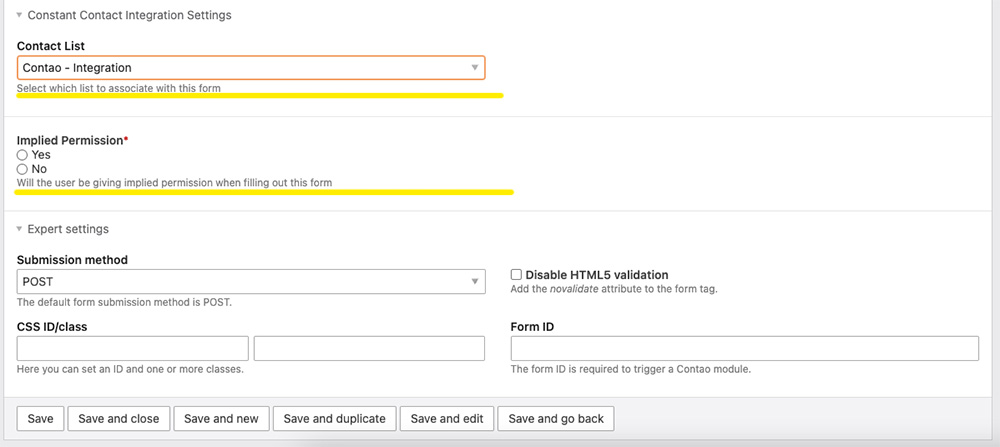
The first is "Contact List", this will select which Contact List the data will be added to. Select the list you wish to create a new contact in.
Second is "Implied Permission". This option is for forms that make it clear the user is signing up to be emailed. Select "Yes" if your form doesn't have a checkbox for the user to choose to be added to a mailing list.
- Step Two: Now, when viewing a Settings page for a Form Field you will find a new option "Linked Field"

This will link the form field to a Constant Contact field. Whichever field you select, that is where this form field's data will be entered within Constant Contact.
- Step Four (Optional): In the event you selected "No" for the "Implied Permission" option, you will need to add a checkbox so the user can give you express permission to be added to a mailing list. So, when you add a Checkbox form field a new option "Express Permission" will be shown. Activate the option if you do not have implied permission on your form.

That is all for now. View your form on the front end and submit it, then check Constant Contact to make sure your data came over. This is the first release and things aren't as clean or neat as I would like. I will be updating this until it is clean and stable, the code and the directions. For now, get started and have fun.
bright-cloud-studio/constant-contact-integration 适用场景与选型建议
bright-cloud-studio/constant-contact-integration 是一款 基于 PHP 开发的 Composer 扩展包,目前已累计 7 次下载、GitHub Stars 达 0, 最近一次更新时间为 2023 年 01 月 03 日, 在 PHP 生态内属于活跃度较高的组件。
它主要适用于以下技术方向: 「cloud」 「contact」 「constant」 「integration」 「studio」 「bright」 等业务场景。在实际项目中,围绕这些方向常见需要落地的问题包括:接口对接、性能调优、并发安全、与既有框架(Laravel / ThinkPHP / Yii / Webman 等)的兼容适配,以及生产环境的日志埋点与稳定性保障。
我们在过去多个企业项目中使用过 bright-cloud-studio/constant-contact-integration 或与其功能相近的方案,如果你在选型或落地过程中遇到问题,例如 版本兼容、二次改造、私有化封装、与内部系统对接、生产 BUG 排查,欢迎联系我们协助评估。
基于 bright-cloud-studio/constant-contact-integration 在你已有业务上做功能扩展、字段裁剪、UI 适配、与内部账号 / 权限 / 日志系统的深度对接。
线上偶发问题、内存泄漏、慢查询、并发异常等排查修复;针对高流量场景做缓存、队列、索引层面的调优。
承接完整的项目从需求 → 设计 → 开发 → 上线 → 长期运维;也可按月提供技术保姆服务。
与 bright-cloud-studio/constant-contact-integration 相关的其它包
同方向 / 同关键字的高下载量 PHP Composer 包推荐,方便对比选型:
A SDK for working with B2 cloud storage.
PHP Magic Constants, even more powerful than an Enum
Small library to access Microsoft Windows Azure Blob Storage with a Service or a StreamWrapper.
UCloud Resource (Cloud) Storage SDK for PHP
The flysystem adapter for yandex disk rest api.
A sleek PHP wrapper around rclone with Laravel-style fluent API syntax
统计信息
- 总下载量: 7
- 月度下载量: 0
- 日度下载量: 0
- 收藏数: 0
- 点击次数: 14
- 依赖项目数: 0
- 推荐数: 0
其他信息
- 授权协议: LGPL-3.0-or-later
- 更新时间: 2023-01-03